Overview
9. Integrating Shopify to Qallix
- 9.1) Shopify
- 9.1.1) Setting Up Developer App in Shopify
- 9.1.2) API Key & Secret Key
- 9.1.3) Admin API access token & Storefront API access token
- 9.1.4) Domain
- 9.2) Qallix
User Manual
1) Logging into Qallix


2) Integrating
Video Tutorial:
Instructions:


- If it’s inactive:

- If it’s active:


2.1) Integrating your stores:


3) Dashboard
Video Tutorial:
Instructions:

4) Analytics
Instructions:
4.1) Overview

4.2) Customer Analysis:


4.3) Profit Analysis:


4.4) Stock Analysis:


5) Orders
Video Tutorial:
Instructions:

5.1) New Orders:

5.2) All Orders:

6) Products:
Instructions:
6.1) Listing:
I) You can select a channel and organisation from the blue-highlighted dropdown menu to view and manage your products.
II) You can delete or edit your product by clicking on the red-highlighted dropdown button.
III) You can search products by entering the SKU or Product name in the green-highlighted search bar.
IV) You can edit the Location, COGS and Stock by clicking on the dropdown menu and edit button in the yellow-highlighted box
6.2) Boost Item:

I) You can choose up to 5 products to boost. Please note that there is a countdown indicating the remaining duration for which you can boost your selected products.

II) You can also create a prioritized list of products that will be boosted once the current batch of boosted products reaches its time limit.

III) To add products to be boosted or be placed in a waiting list, click on the red-highlighted “+ Add Items to List” button.

IV) To add or boost products, click on the red-highlighted checkbox next to the desired product(s). You can use the search bar to make the process easier.
V) Once you have selected the product(s), click on either the green-highlighted "Add to Waiting List" or the blue-highlighted "Boost Now" button to proceed.
*PLEASE NOTE THAT ITEM BOOSTING IS ONLY FOR SHOPEE PRODUCTS*
6.3) COGS:

I) You can view your channels and Item SKU by clicking on the red-highlighted dropdown button.
II) You can add inventory by clicking on the green-highlighted “+ Add Inventory” search bar.
III) You can edit the cost of good sold (COGS) by clicking on the blue-highlighted pen icon. The screen below will appear. Enter the New COGS before clicking on the purple “Edit” button to finalise your changes.

IV) For the yellow-highlighted “Edit” button, it is the same as the “+ Add New” function under the Inventory page. Please read 7.1) SKU Mapping for more Details.
7) Inventory:
Instructions:
7.1) SKU Mapping:

I) Click on the red-highlighted 'Inventory'. The image below showcases the Inventory landing page.

II) Click on the red-highlighted “+ Add New” button shown below.

III) Enter the required information in the field above.
- From the Product Name field to the Alert Qty field, all fields are required.
- The Rack Id field is optional and represents the location of the stock.
IV) Associate the new product with an SKU that corresponds to your existing products. You can select single or multiple similar products to map the new product. This step is optional.

V) Click the red-highlighted "save" button to store the information in the system.
VI) The Inventory page provides a comprehensive overview of all the previously created or imported product(s).

VII) On the inventory landing page, click the red-highlighted view button under the “Action” column.

VIII) Update the required field(s) for the product based on the provided text field(s).
IX) Click the red-highlighted save button to save the changes.

X) On the pop-up view, click the history button highlighted in red.

XI) From the pop-up view, use the red-highlighted field to filter by day, month, year, or custom dates.

XII) The filtered results, including the platform(s) where the product is sold and the quantity sold, can be depicted based on the red-highlighted section.

XIII) On this pop-up page, use the red-highlighted sync toggle to update your product synchronously or manually.
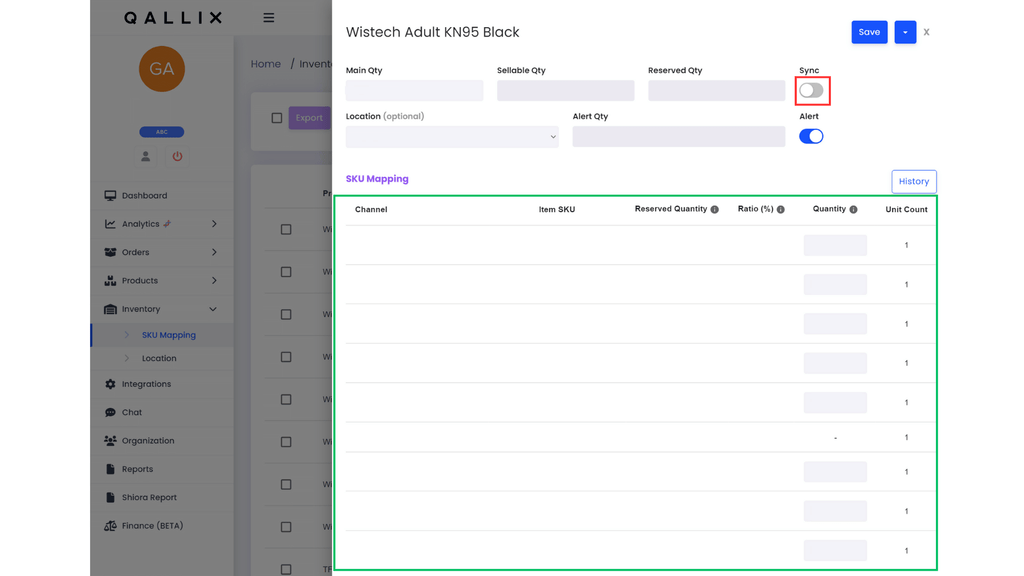
XIV) When you turn off the red-highlighted sync toggle, you can see a comprehensive view of the product details in the green-highlighted section. This includes the channel, item SKU(s), ratio (%), reserved quantity, and quantity.
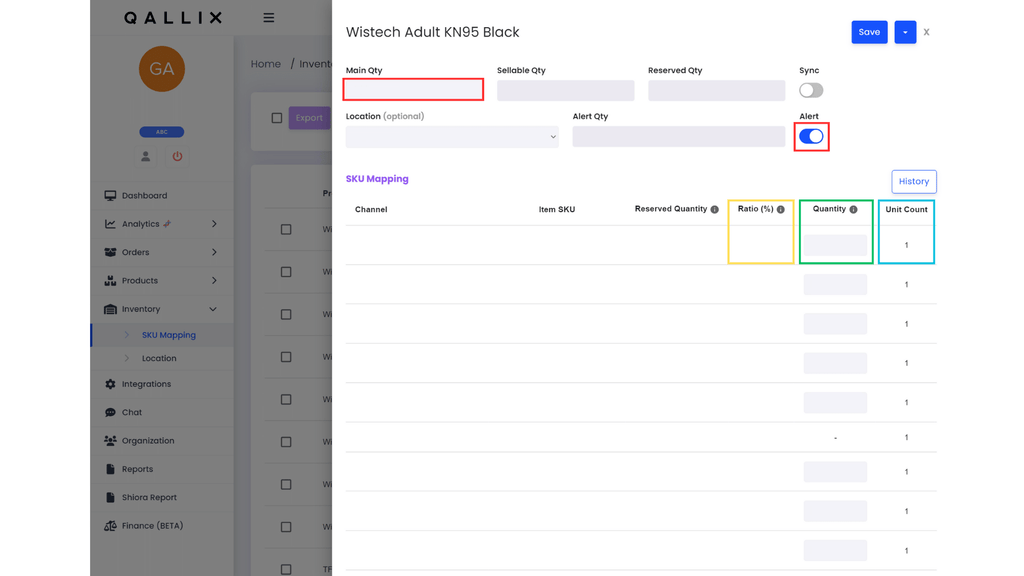
XV) Please take note of the following details based on the figures below:
- The red-highlighted quantity/suggested quantity is determined by the formula: (Main Qty * Ratio (%)) + Reserved Quantity.
- Both the main quantity and the quantity should not be lower than the reserved quantity.
- The ratio (%) figures represent the sales contribution of the Item SKU in the previous month.
- The reserved quantity is set aside for upcoming campaign purposes.
XVI) To enable automatic product syncing, toggle the sync on, similar to the red-highlighted alert toggle below.

XVII) On this page, you can filter your inventory by 'Creation Date' or 'Quantity Level' of the products highlighted in red below.
XVIII) Additionally, you can quickly find your products by typing the product name you are searching for, highlighted in green below.

XIX) Select the product(s) you want to export by clicking the green-highlighted checkbox provided.
XX) After confirming your selection, click the red-highlighted "Export" button, which displays the number of selected items.


XXI) Upon clicking the export button, an Excel sheet will be downloaded to your system, displaying relevant information about the product(s).

XXII) Click the red-highlighted import button to import new product(s).

XXIII) Click on the 'Choose Files' above to select an Excel file containing the information of the new product(s) to be uploaded.

XXIV) Choose an Excel file containing the information of the new product(s) to upload to the Qallix Console/Database.

XXV) Once the Excel file has been successfully uploaded to the Qallix Console/Database, you will be able to view the newly captured product(s).
XXVI) By default, the table will show 10 rows of created or imported products. Modify the number of displayed rows by utilizing the red-highlighted drop-down list.
7.2) Location:
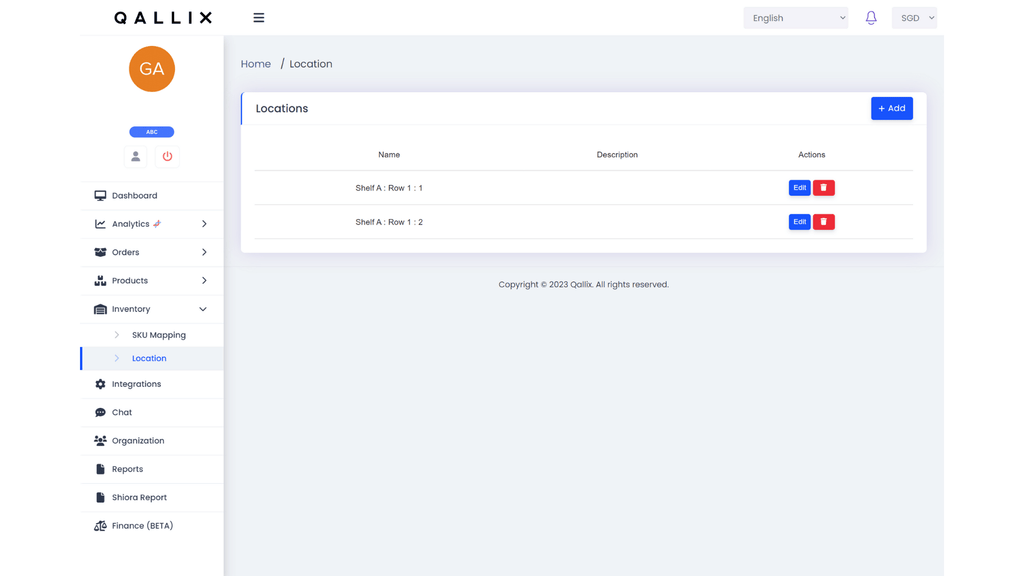
I) You can delete or edit your product location by clicking on the blue “Edit” button or the red delete button.

II) Once you have finished editing the location, click the blue “Save” button. The new location will now be displayed on the Organization page.

III) To delete a location, click on the red delete button.

IV) To add a new location, click on the blue “+ Add” button in the right-hand corner.
V) Input the Name and Description of your new location clicking on the blue “Submit” button.
8) Reports:
Instructions:

I) To obtain the Sales Item Report, click on the "Select Dates" bar to choose the desired sales date range. After selecting the dates click on the red-highlighted "Export CSV" button.
II) To generate the Revenue Report, select the desired sales date range by clicking on the "Select Dates" bar. Then, choose the time frame (days, months, or years) for the report calculation. Finally, click on the green-highlighted "Export CSV" button.
9) Integrating Shopify to Qallix
9.1) Shopify
9.1.1) Setting Up Developer App in Shopify
I) Log in to your Shopify Seller Centre, and click on Settings as shown in the Red Box on the bottom left corner

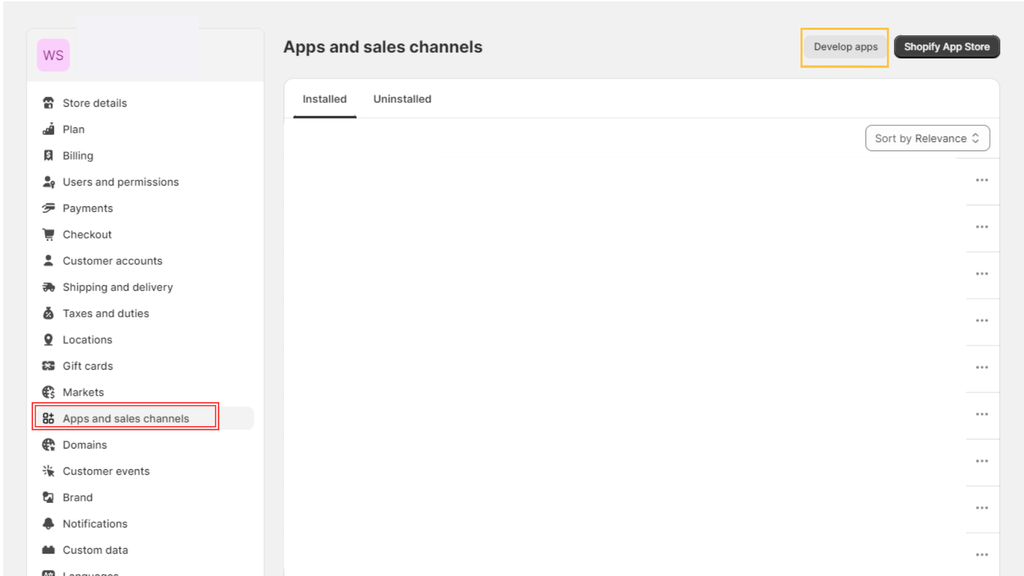
II) Firstly, click on Apps and sales channels as shown in the Red Box, follow up by clicking on the Develop apps in the Yellow Box.
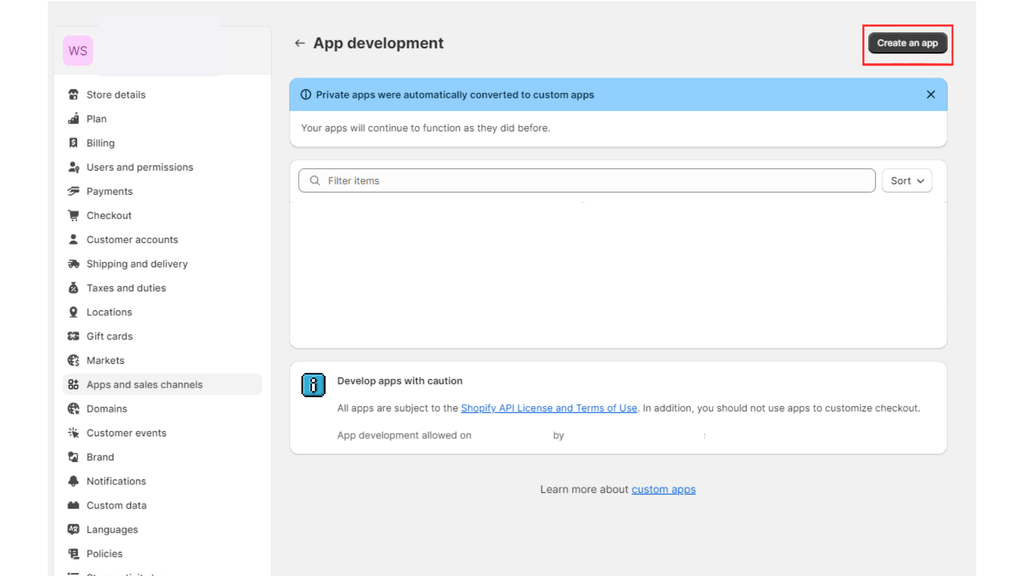
III) Click on the Create an app button on the top right corner as shown in the Red Box
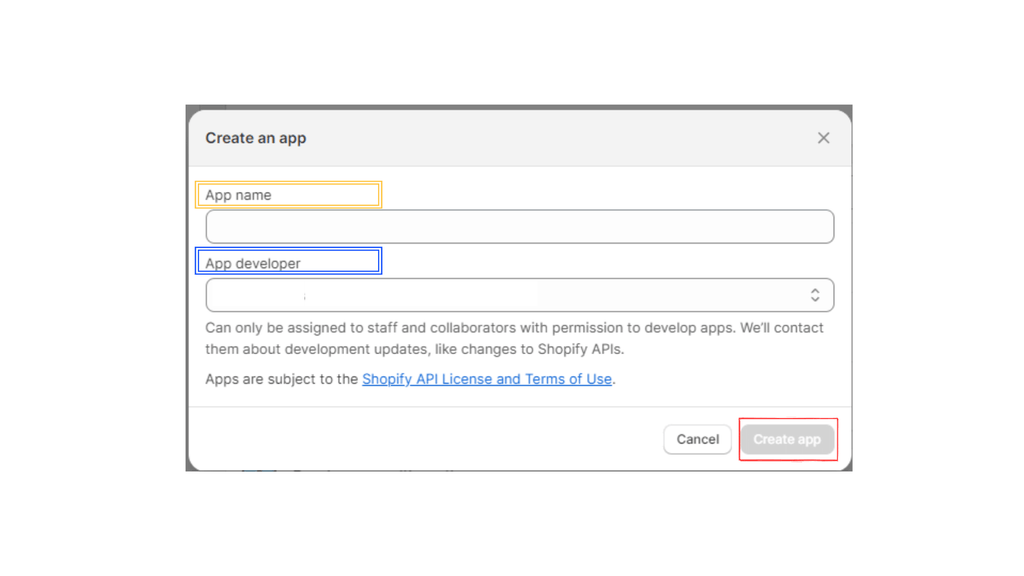
IV) After completing step III, a pop up will be shown on your webpage, put Qallix as the App name in the Yellow Box, and for the App developer in the Blue Box just select one of the users shown in the dropdown. Finally click on Create app in the Red Box.
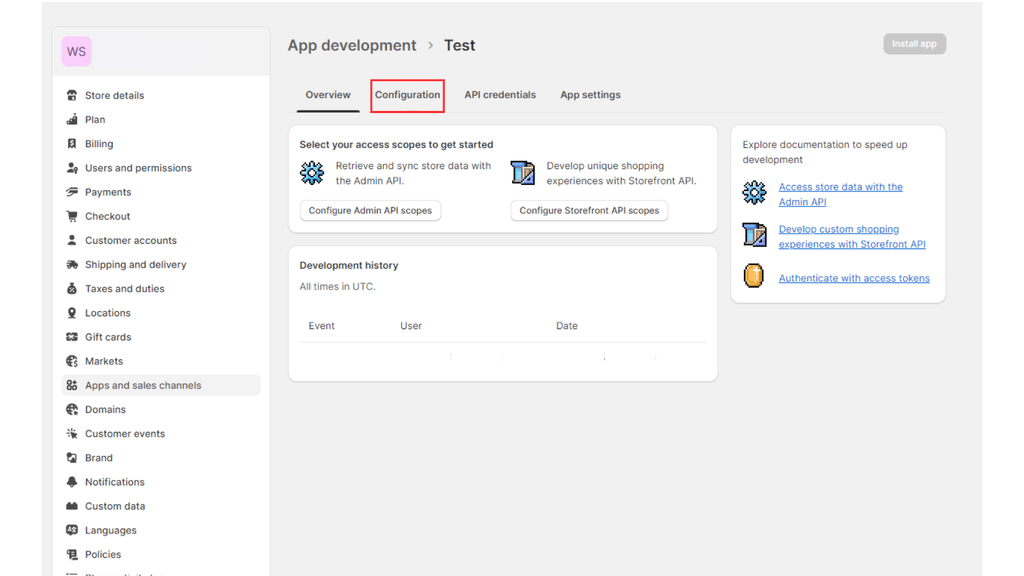
V) Click on the Configuration tab shown in the Red Box
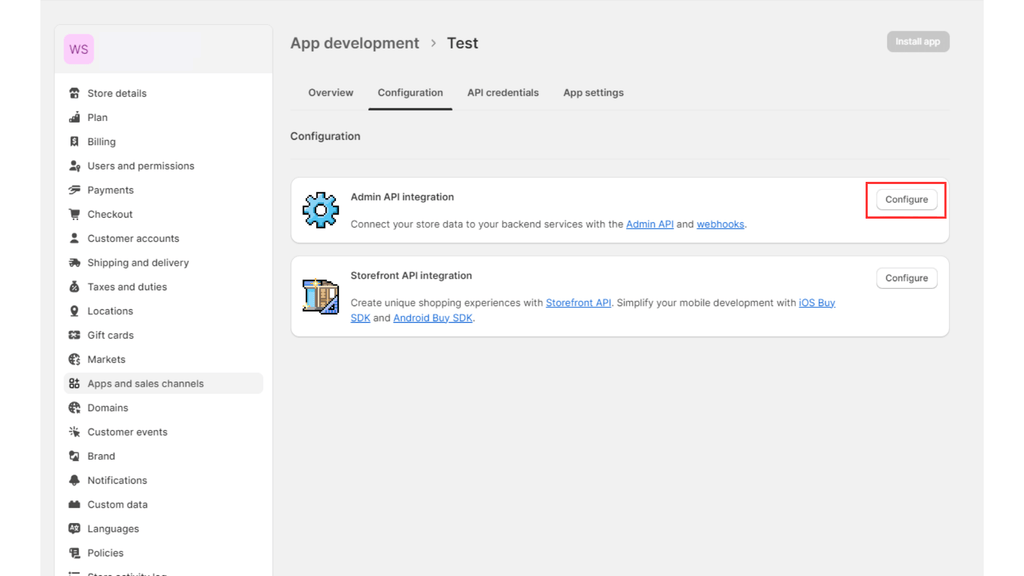
VI) Click on the Configure button as shown in the Red Box.
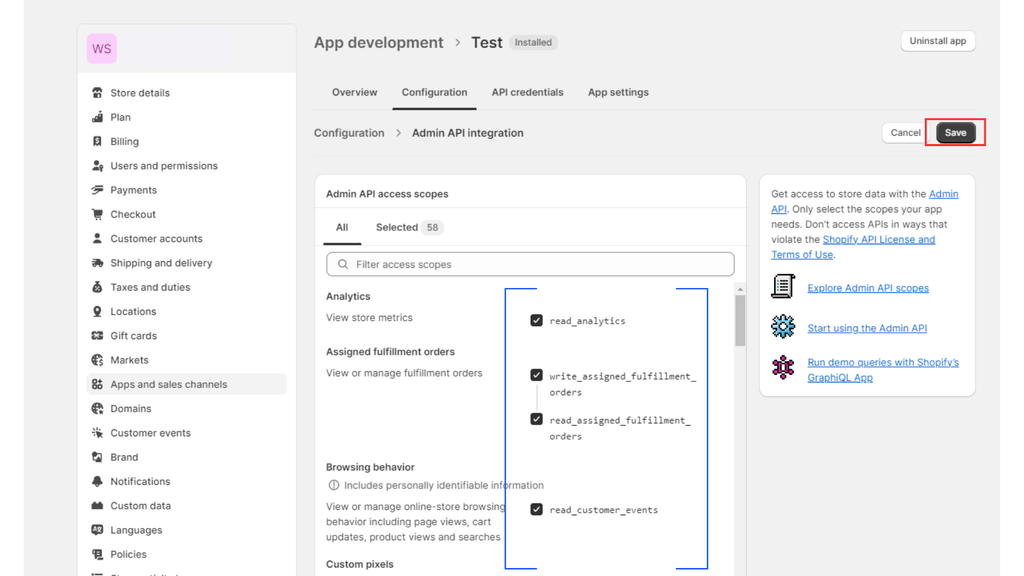
VII) After doing so, you should be able to see the page as shown below. Tick every Item in the Blue Box [Remember to Scroll Down for more Items to Tick] , and finally click on the Save Button as shown in the Red Box
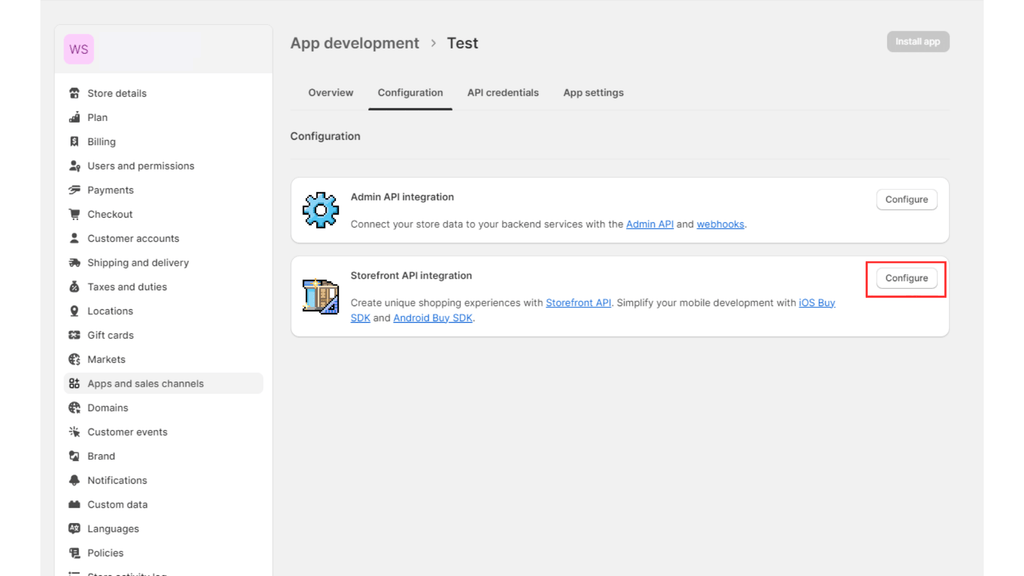
VIII) Go back to the Configuration Tab and Click on the Configure button as shown in the Red Box for the Storefront API integration and copy Step VII.
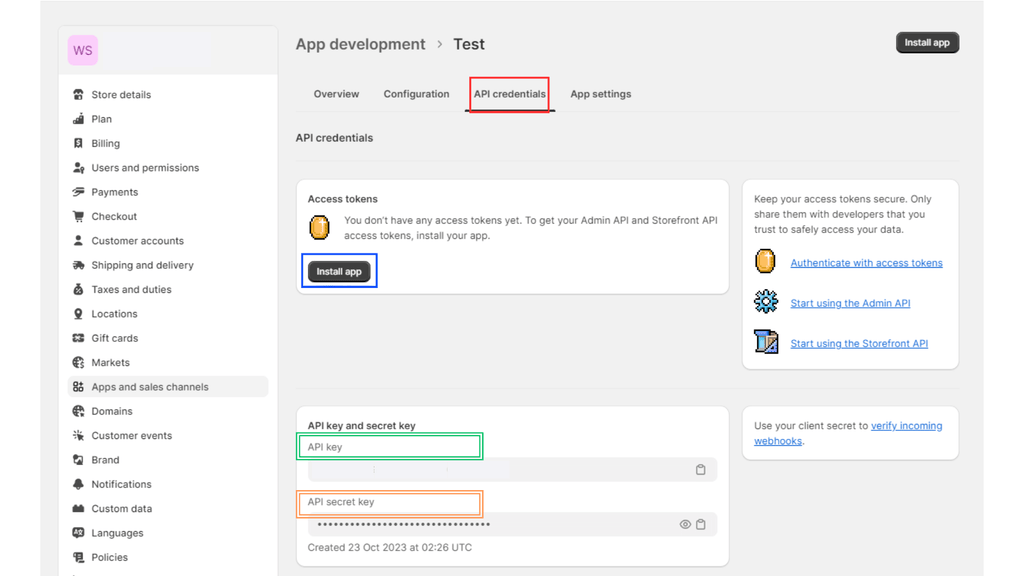
9.1.2) API Key & Secret Key
I) Click on the API credentials tab as shown in the Red Box. Click on the Install app button in the Blue Box. Keep in mind that the API key in the Green Box, and API secret key in the Orange Box can be found in this page as well.
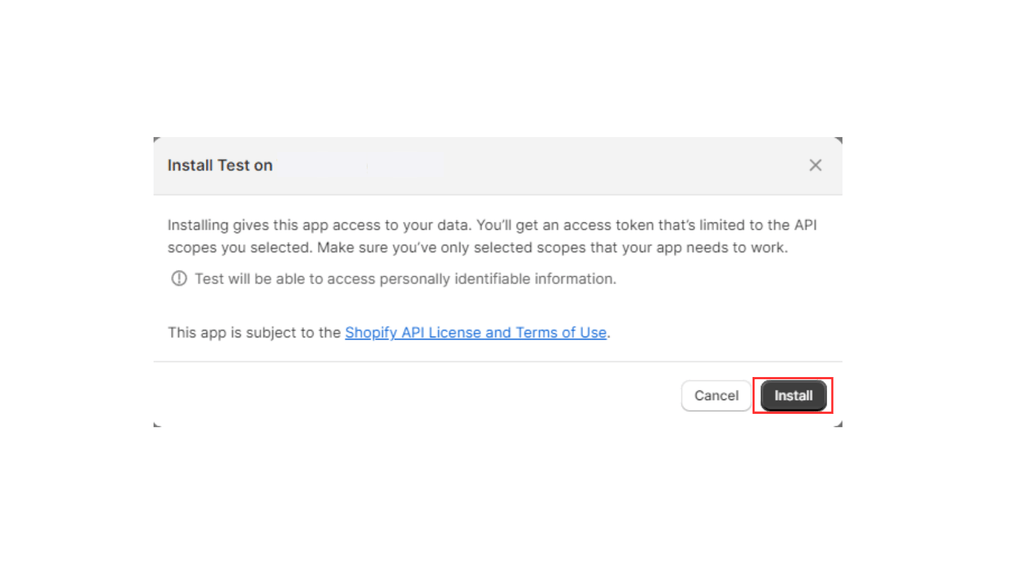
II) After clicking on the Install app button , there should be a pop up on your webpage. Click on the Install button as shown in the Red Box.
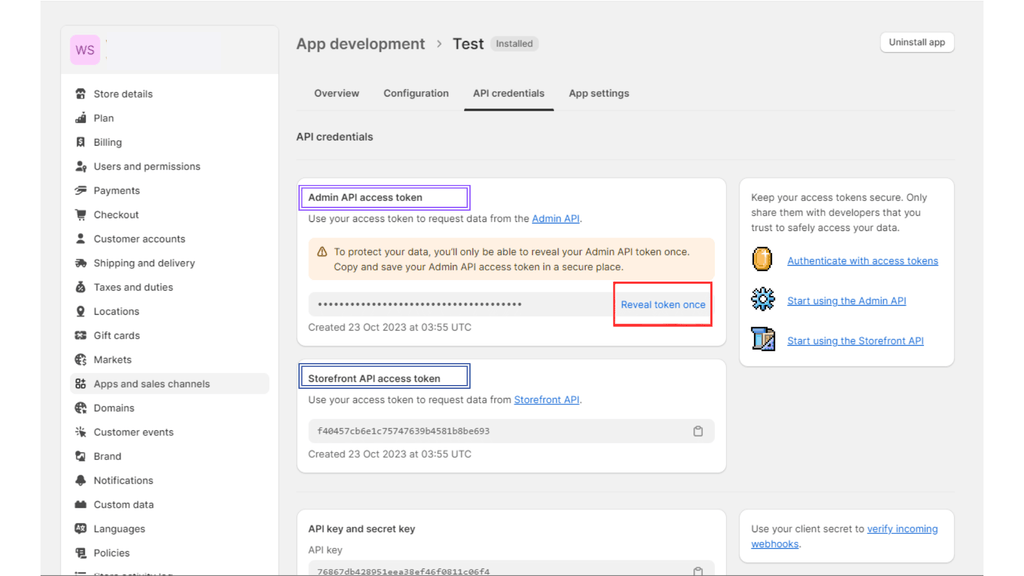
9.1.3) Admin API access token & Storefront API access token
I) After doing so, you should be able to see your Admin API access token in the Purple Box, and the Storefront API access token as shown in the Blue Box. Please take note that the Admin API access token can only be revealed once [Reveal token once] as shown in the Red Box. Save the Admin API access token in a Notepad to be safe.
9.1.4) Domain
I) To get your domain, Click on the Domains button in the Red Box, you will find your Domain Name as shown in the Pink Box.

9.2) Qallix
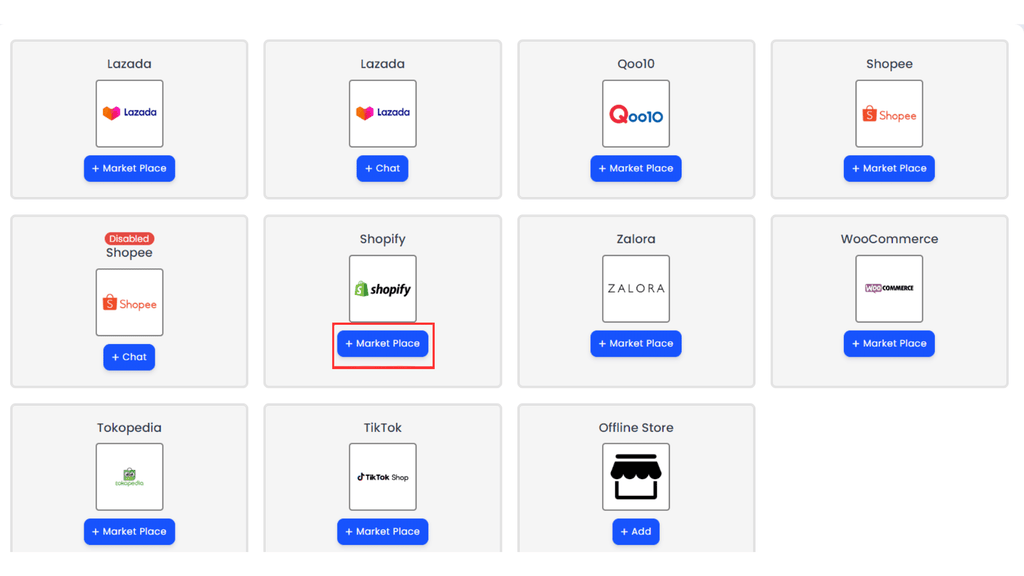
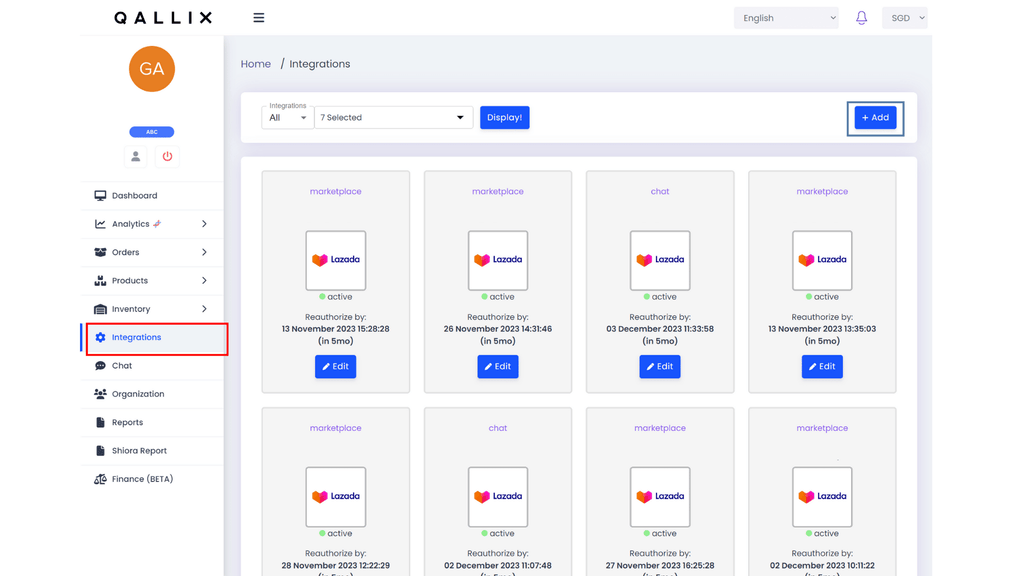
I) First Click on the Integration tab on the left in the Red Box. Once in the Integration page, Click on the Add button in the Blue Box.

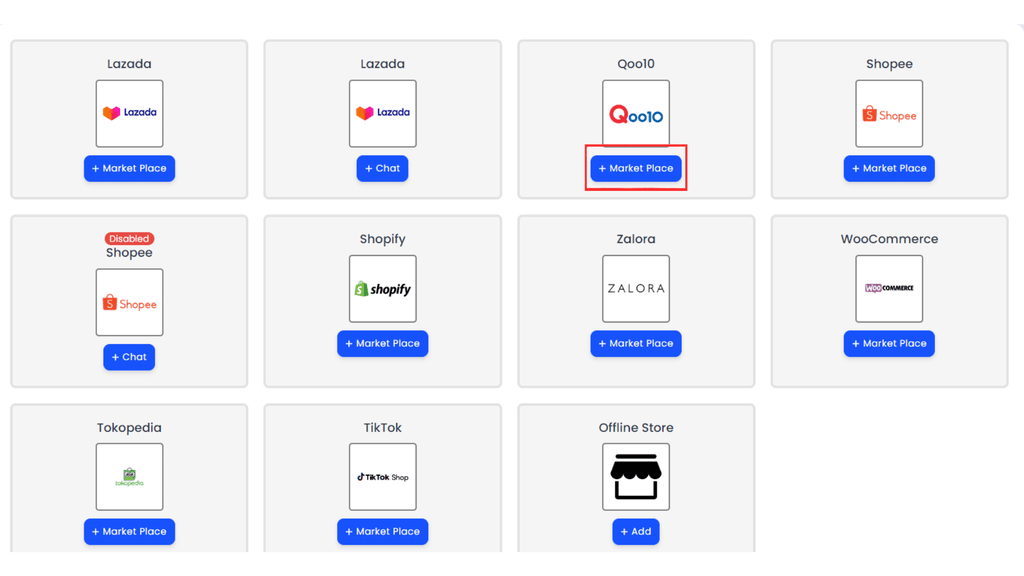
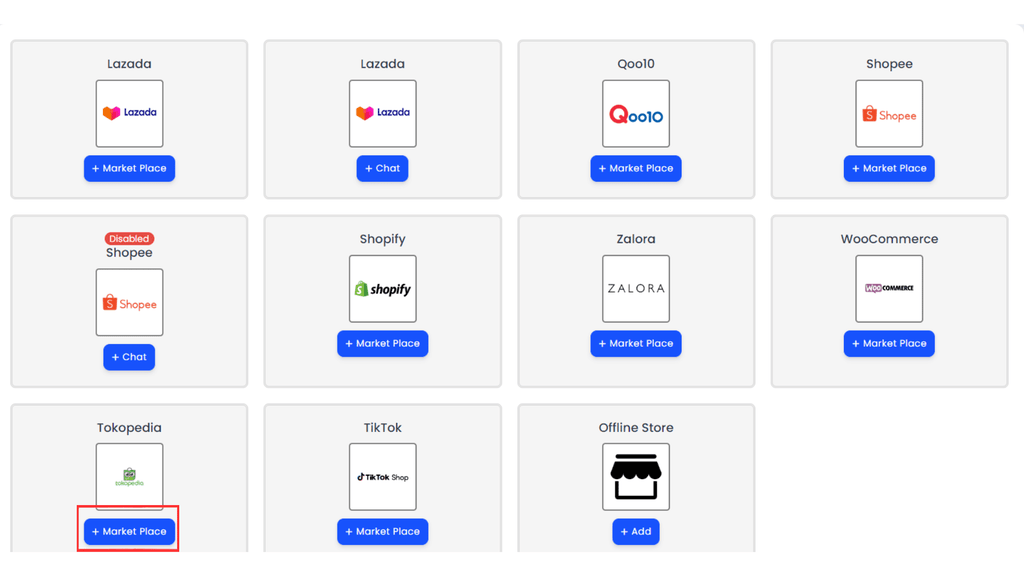
II) Once in the Add page, click on the Marketplace Button for Shopify in the Red Box
III) Here are a list of details you need to fill in for your Shopify Integration
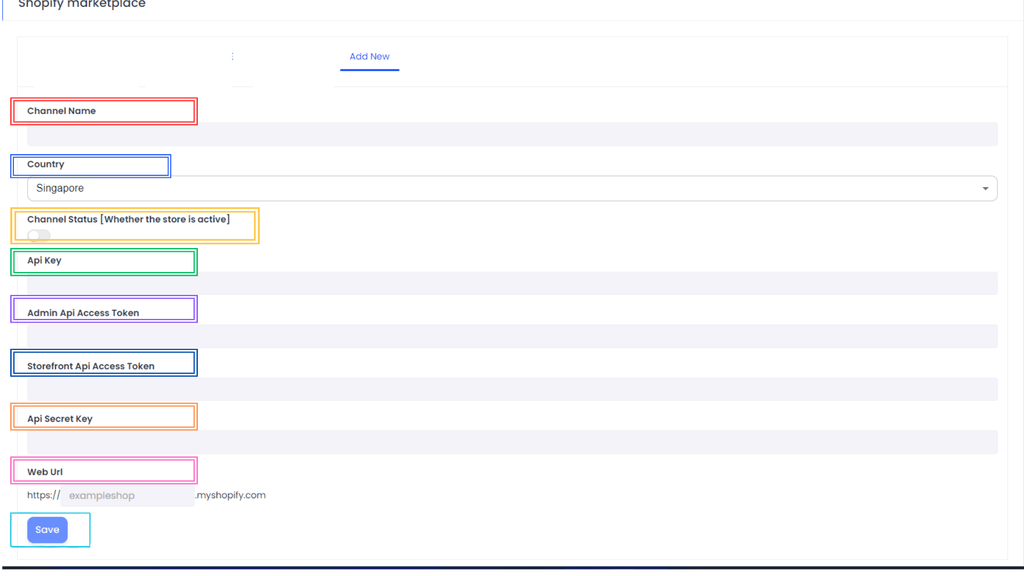
- Channel Name: You can insert your Channel Name here
- Country: Select your Shopify Store Country
- Channel Status: Switch the button ON/OFF to indicate whether the store is ACTIVE/INACTIVE
- Api Key: Follow the steps in Section 9.1.2 [API key & API Secret Key]
- Admin Api Access Token: Follow the steps in Section 9.1.3 [Admin API access token & Storefront API access token]
- Storefront Api Access Token: Follow the steps in Section 9.1.3 [Admin API access token & Storefront API access token]
- Api Secret Key: Follow the steps in Section 9.1.2 [API key & API Secret Key]
- Web Url: Follow the steps in Section 9.1.4 [Domain]
- Save: Click on this button once every details are filled in
10) Integrating Qoo10 to Qallix:
10.1) Qoo10
10.1.1) Getting the API from your Sales Manager
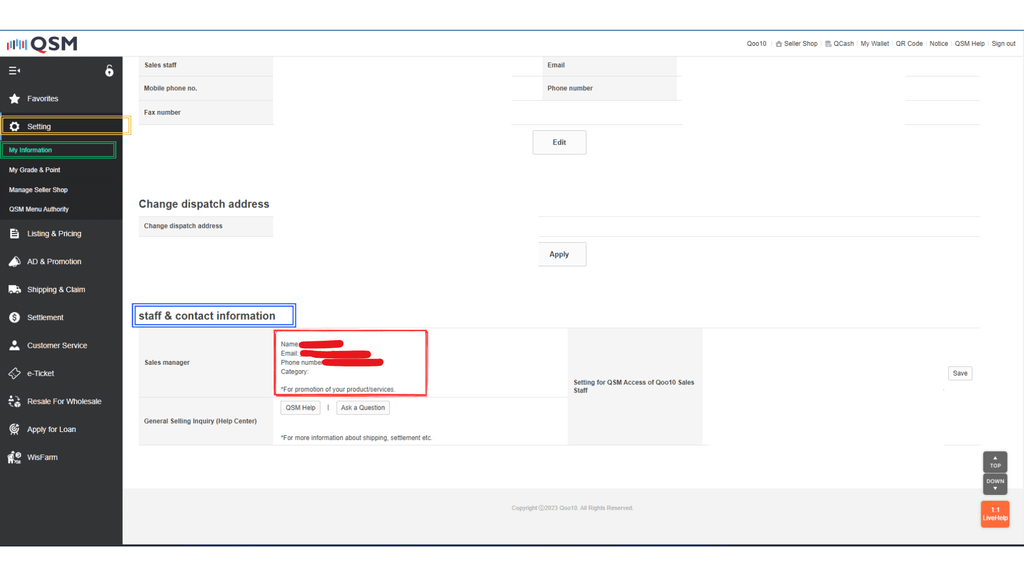
I) Log in to your QSM, and click on the Setting button as shown in the Yellow Box in the picture below. A drop down will be displayed after clicking the Setting button, click on My Information button in the Green Box. Finally scroll all the way down until you find the staff & contact information section as shown in the Blue Box. Your Sales Manager contact will be in the Red Box, contact them to get your Store’s API Key. [Remember to include your User ID when applying for the API Key. You can find it at the top of this page under the Seller Information section.]
10.1.2) Getting the Account and Password from Qoo10
I) To retrieve your Account and Password, it is the same as your Username and Password when logging in to QSM

10.2) Qallix
I) First Click on the Integration tab in the Red Box. Once in the Integration page, Click on the Add button in the Blue Box.
II) Once in the Add page, click on the Marketplace Button for Shopify in the Red Box
III) Here are a list of details you need to fill in for your Shopify Integration
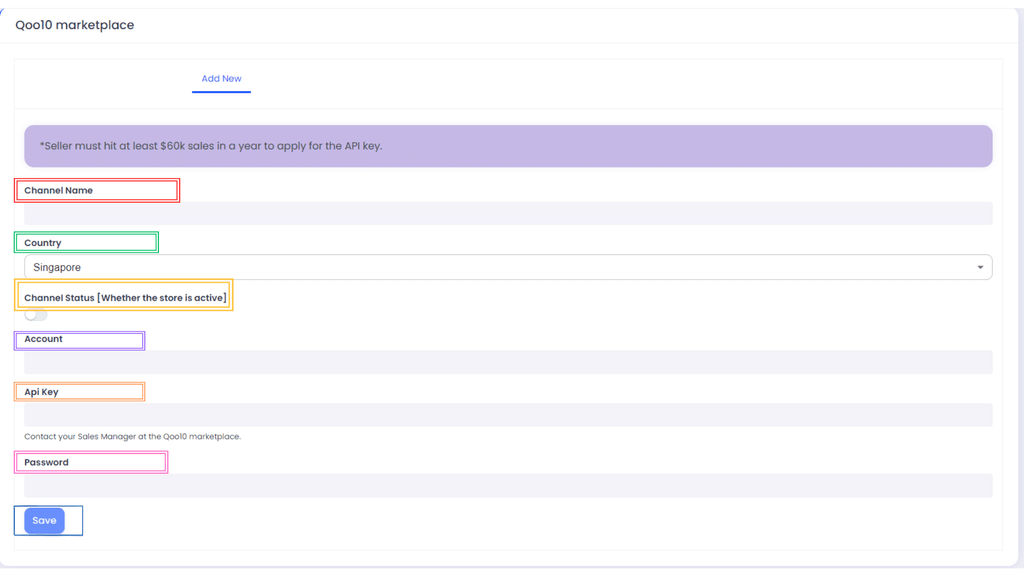
- Channel Name: You can insert your Channel Name here
- Country: Select your Shopify Store Country
- Channel Status: Switch the button ON/OFF to indicate whether the store is ACTIVE/INACTIVE
- Account: Follow the steps in Section 10.1.2 [Getting the Account and Password from Qoo10]
- Api Key: Follow the steps in Section 10.1.1 [Getting the API from your Sales Manager]
- Password: Follow the steps in Section 10.1.2 [Getting the Account and Password from Qoo10]
- Save: Click on this button once every details are filled in
11) Integrating Tokopedia to Qallix:
11.1) Tokopedia
11.1.1) Getting Domain Toko [Shop Domain] in Tokopedia
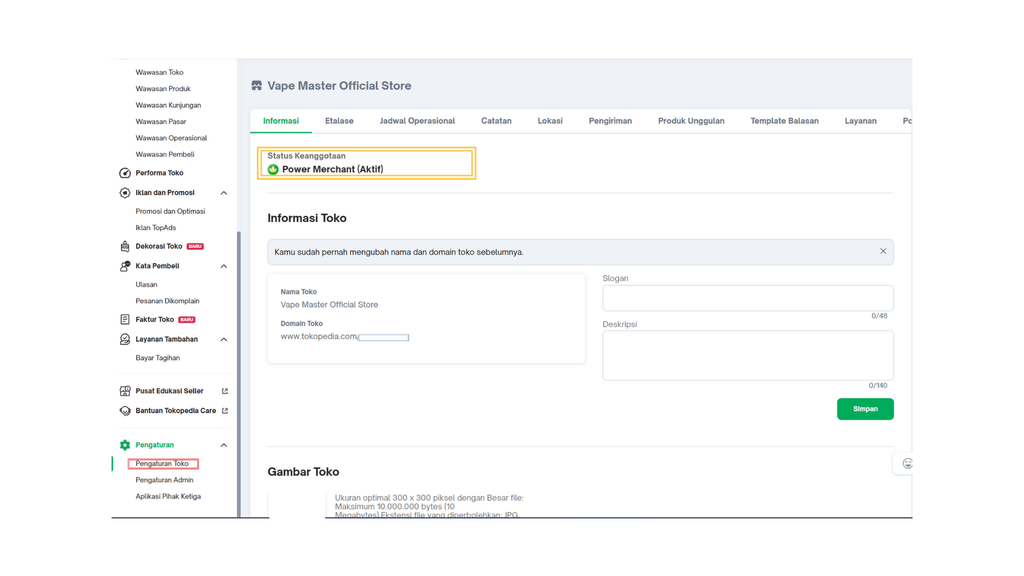
I) Log in to your Tokopedia Seller, and click on the Pengaturan [Arrangement] at the side tab. There will be a dropdown, click on the Pengaturan Toko [Store Settings] button in the Red Box. Here you can see the Status Keanggotaan [Membership Status] in the Yellow Box and your Domain Toko [Shop Domain] in the Blue Box.
Note:
- Only Power Merchant or Official Store Status Keanggotaan [Membership Status] are available for 3rd party integration.
11.2) Qallix
11.2.1) Adding your Tokopedia Details in Qallix
I) First Click on the Integration tab in the Red Box. Once in the Integration page, click on the Add button in the Blue Box.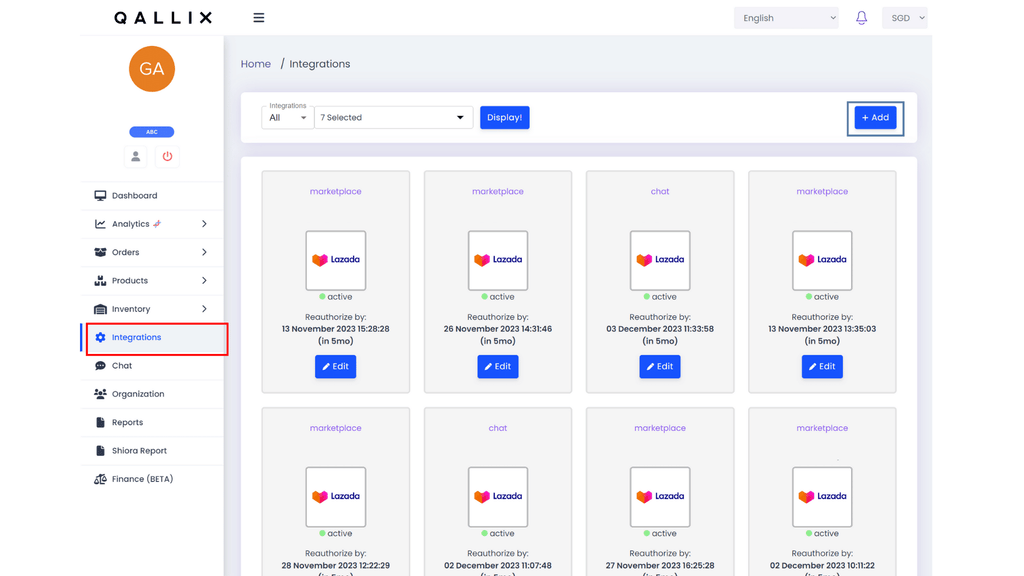
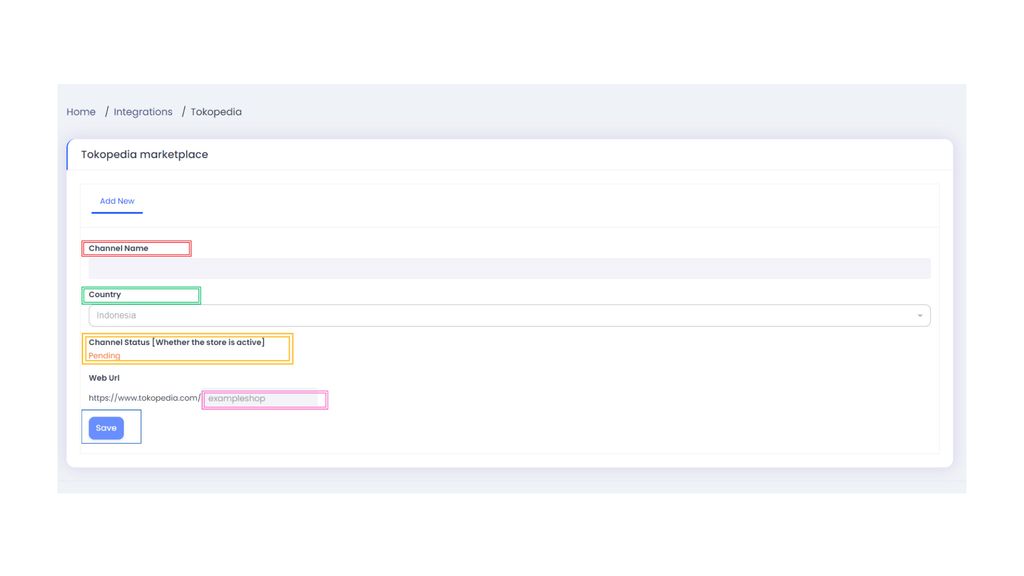
- Channel Name: You can insert your Channel Name here
- Country: It is set to only Indonesia
- Channel Status: Currently the Status will be Pending until the Integration is fully completed
- Web Url: Follow the steps in Section 11.1.1 [Getting Domain Toko [Shop Domain] in Tokopedia]
- Save: Click on this button once every details are filled in
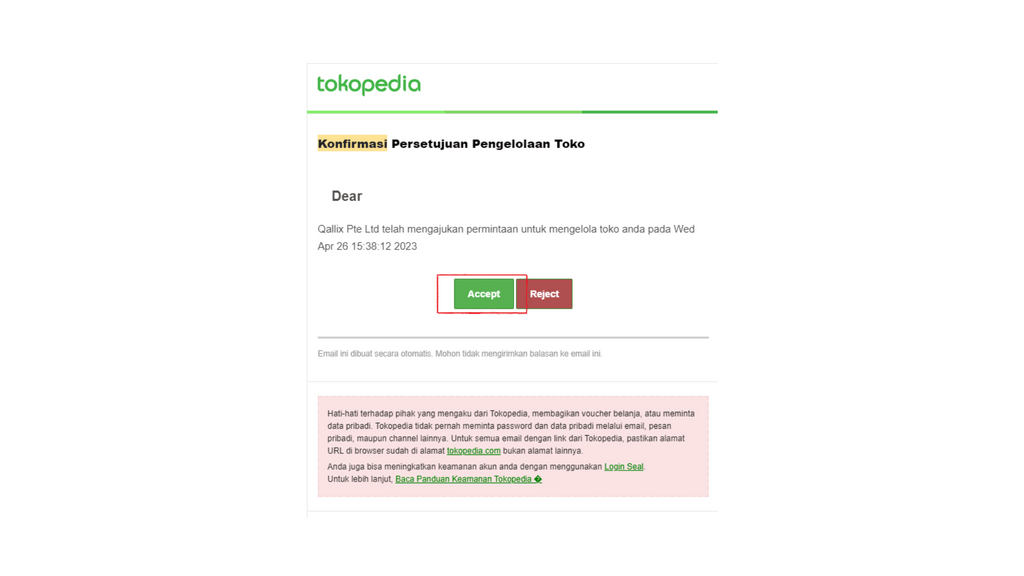
11.2.2) Getting an Confirmation Email from Tokopedia
I) After clicking save, you will receive a Confirmation Email from Tokopedia. Click on Accept in the Red Box and you have successfully integrated your Tokopedia Store with Qallix. Keep in mind, your Tokopedia Store might take a day to be visible in Qallix.