User Manual
User Manual - Integrate
9) Integration

I) Head over to Integrations to view all your integrations to the different platforms.
II) You will see your store on the integration page with its current status:
- If its active:

- If it is inactive:


III) To edit the activity of your store, you can click on the red-highlighted “Edit” button underneath the store to change.

IV) To add your store, you can click the red-highlighted "+ Add" button
9.1) Integrating Lazada
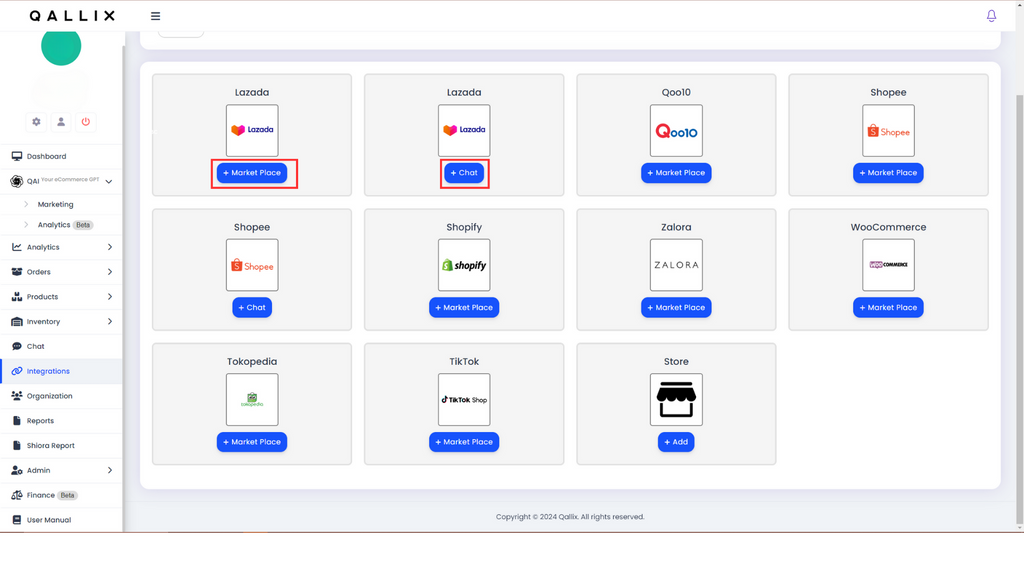
I) After pressing the "+ Add Store" button, you will be taken to the marketplace page where you can choose the platform you want to integrate with.
II) For Lazada Market Place and Chat Integrations, press the respective red-highlighted buttons to authorize Qallix.
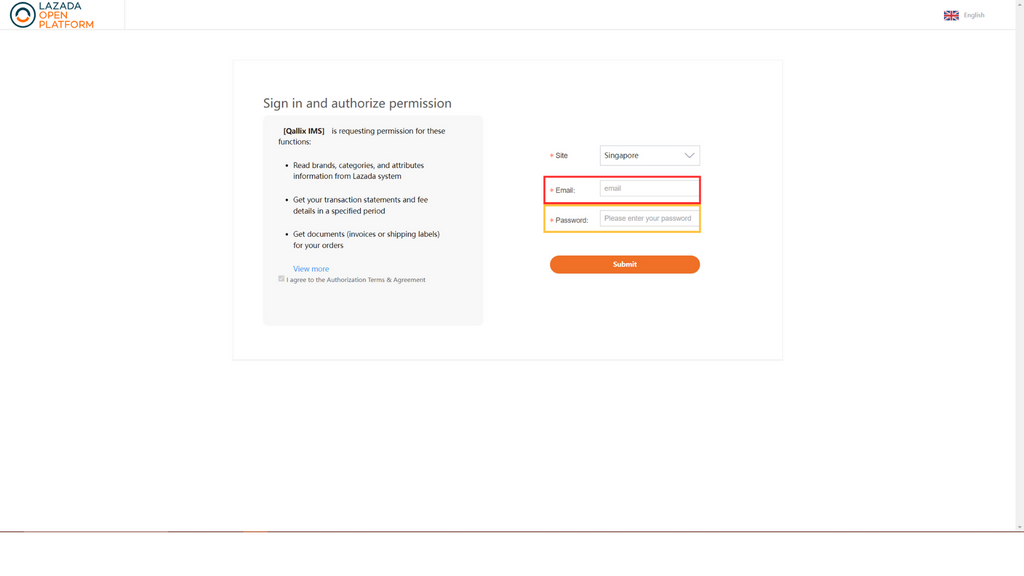
Once the Lazada Button is pressed, you will be redirected to this page.
III) Change the country respectively and enter your account details to the red and yellow highlighted boxes to sign in.
IV) After the Sign In, follow the site instructions to authorize permissions to integrate your store.
9.2) Integrating Qoo10
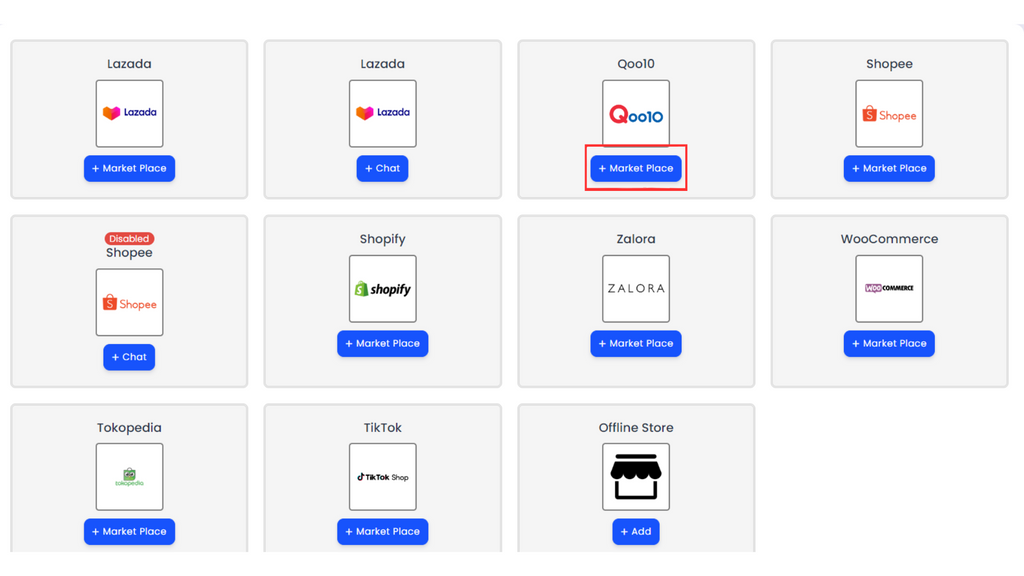
I) To Integrate Qoo10, click the red-highlighted button to enter your details for integration.
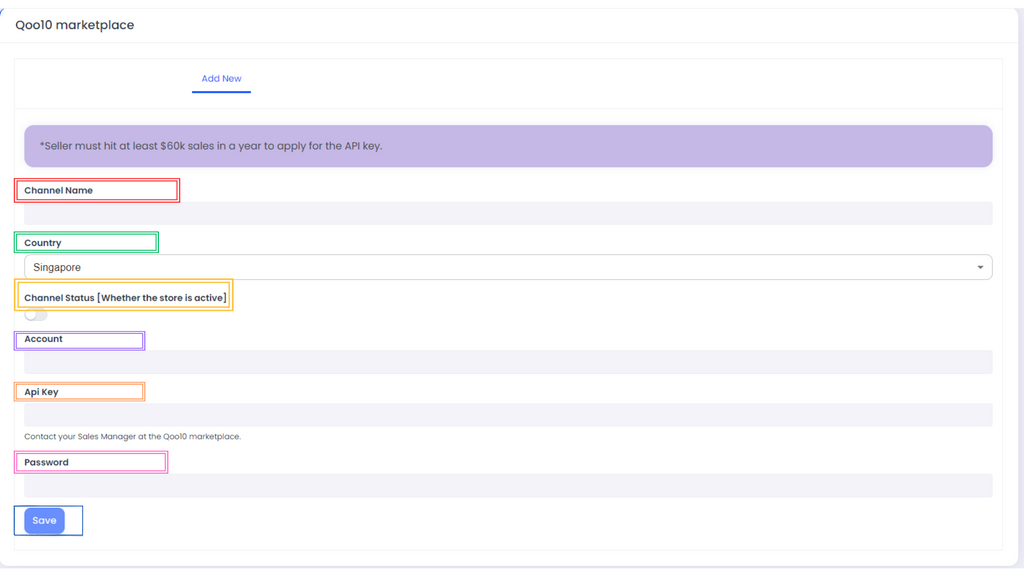
II) These are all the information needed to integrate your Qoo10 Store.
- Channel Name: You can insert your Channel Name here
- Country: Select your Shopify Store Country
- Channel Status: Switch the button ON/OFF to indicate whether the store is ACTIVE/INACTIVE
- Save: Click on this button once every details are filled in
The Account, API Key and Password will be retrieved at later steps if you do not know these details.
III) Retrieving your API Key:
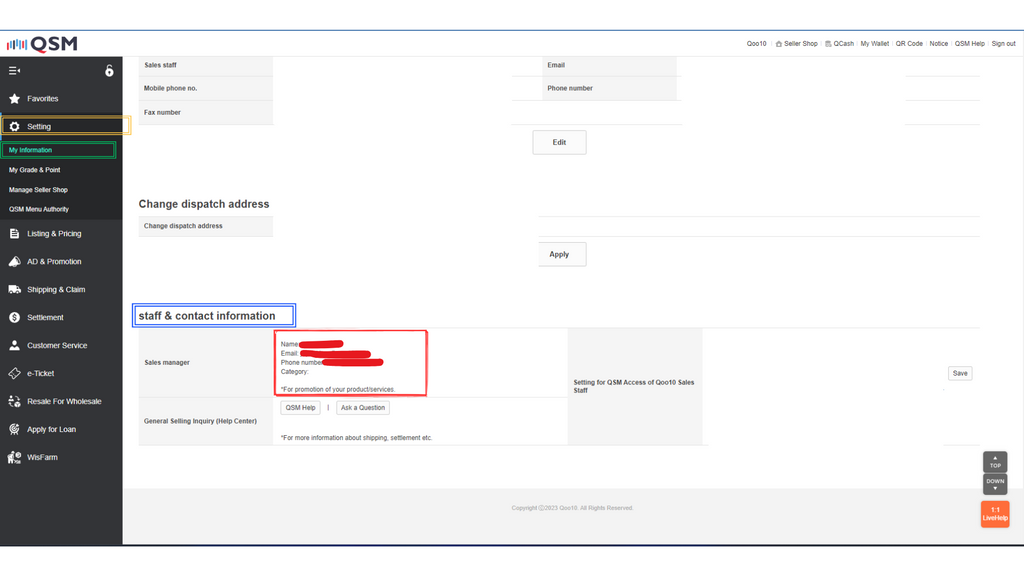
- Log in to your QSM, and click on the Setting button as shown in the Yellow Box in the picture below. A drop down will be displayed after clicking the Setting button, click on My Information button in the Green Box.
- Finally scroll all the way down until you find the staff & contact information section as shown in the Blue Box. Your Sales Manager contact will be in the Red Box, contact them to get your Store’s API Key.
-
Remember to include your User ID when applying for the API Key. You can find it at the top of this page under the Seller Information section.
IV) Retrieving your Account and Password:
- To retrieve your Account and Password, it is the same as your Username and Password when logging in to QSM

9.3) Integrating Shopee

I) For Shopee Market Place and Chat Integrations, press the respective red-highlighted buttons to authorize Qallix.

II) Once the Shopee Button is pressed, you will be redirected to this page.
III) Enter your account details to the red and yellow highlighted boxes to sign in.
IV) After the Log In, follow the site instructions to authorize permissions to integrate your store.
9.4) Integrating Shopify
If you have already set up your developer app in Shopify, know your API and Secret Key and have your Admin API Access Token and Storefront API Access Token, Skip to Step XII (Step 12)
I) Log in to your Shopify Seller Centre, and click on Settings as shown in the Red Box on the bottom left corner

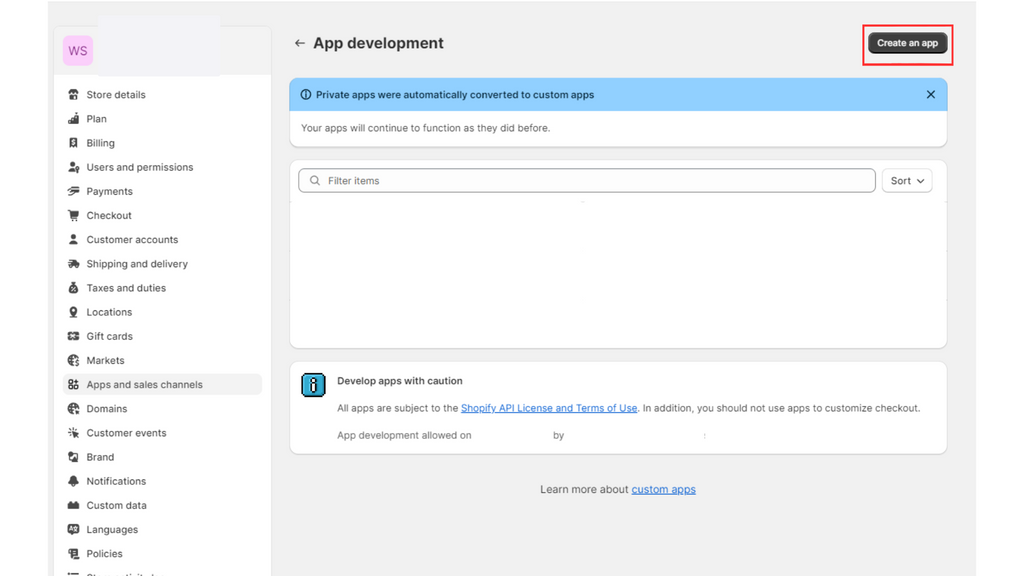
II) Firstly, click on Apps and sales channels as shown in the Red Box, follow up by clicking on the Develop apps in the Yellow Box.

III) Click on the Create an app button on the top right corner as shown in the Red Box.
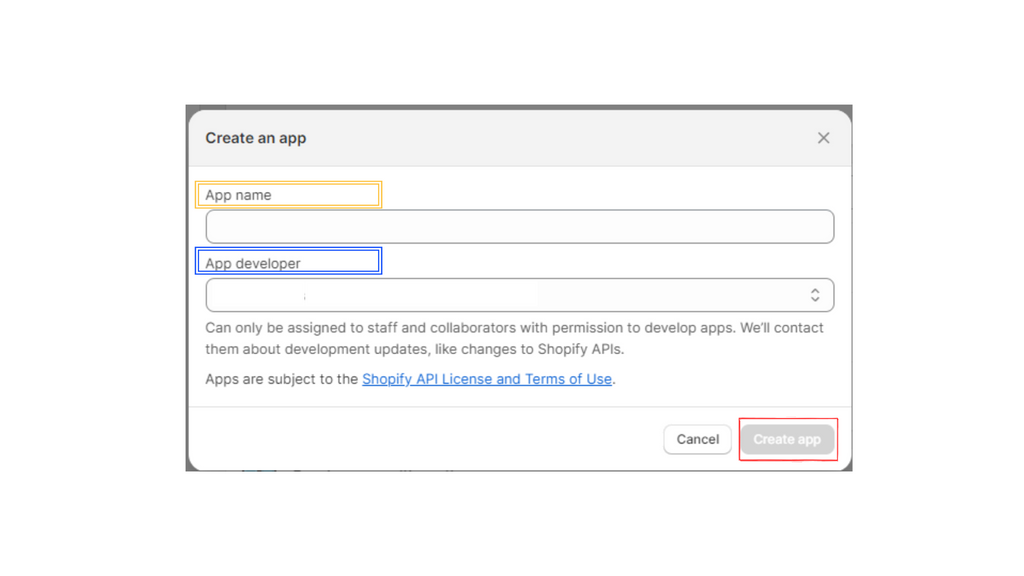
IV) After completing step III, a pop up will be shown on your webpage, put Qallix as the App name in the Yellow Box, and for the App developer in the Blue Box just select one of the users shown in the dropdown. Finally click on Create app in the Red Box.
V) Click on the Configuration tab shown in the Red Box.

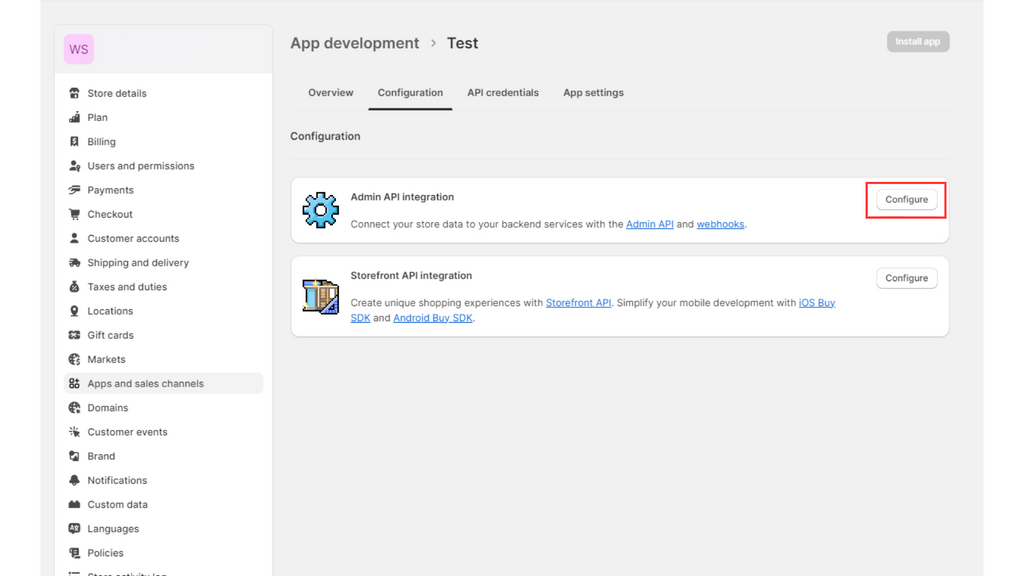
VI) Click on the Configure button as shown in the Red Box.
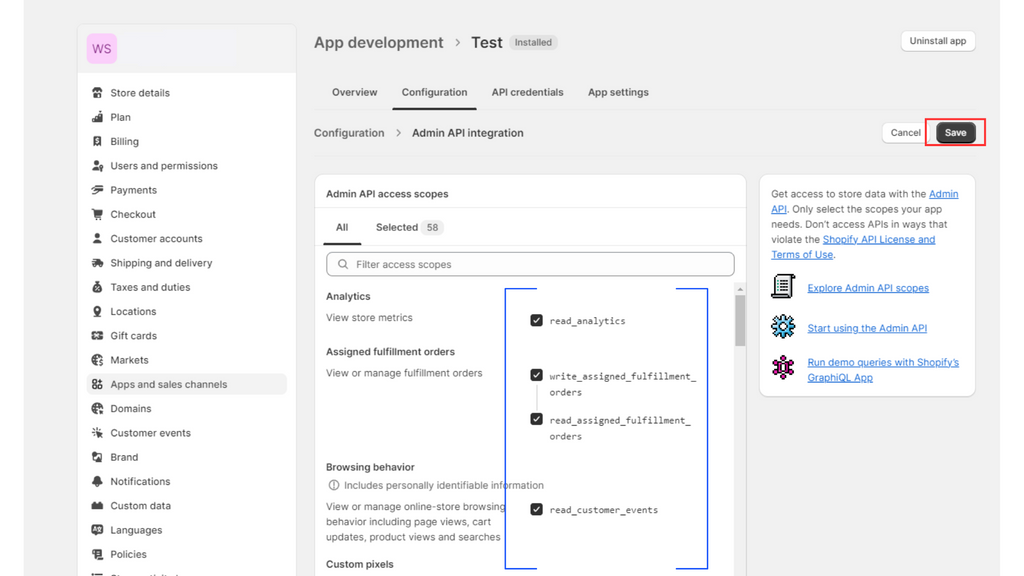
VII) After doing so, you should be able to see the page as shown below. Tick every Item in the Blue Box [Remember to Scroll Down for more Items to Tick] , and finally click on the Save Button as shown in the Red Box.
VIII) Go back to the Configuration Tab and Click on the Configure button as shown in the Red Box for the Storefront API integration and copy Step VII.

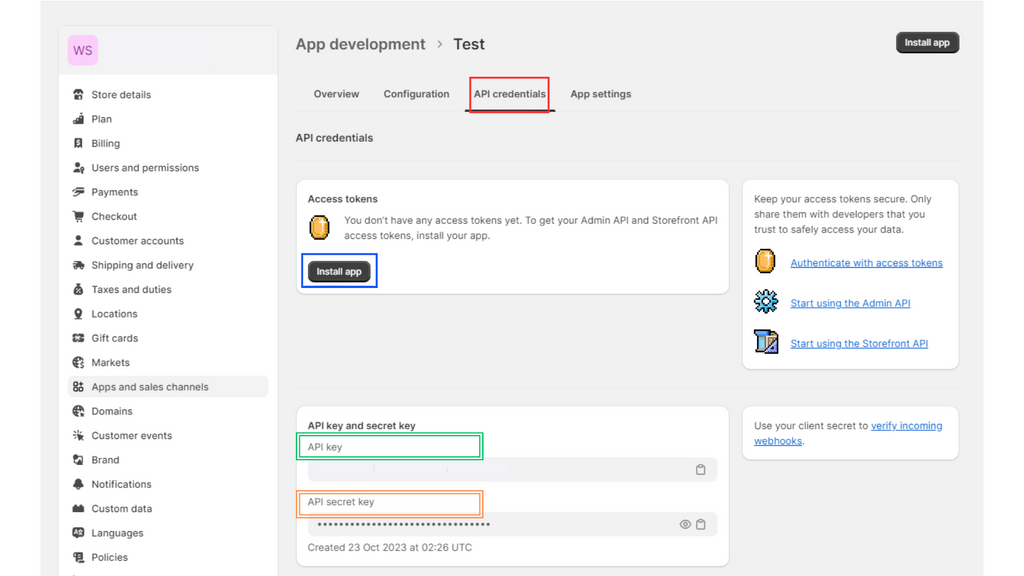
IX) Getting your API and Secret Key:
-
Click on the API credentials tab as shown in the Red Box. Click on the Install app button in the Blue Box. Keep in mind that the API key in the Green Box, and API secret key in the Orange Box can be found in this page as well.
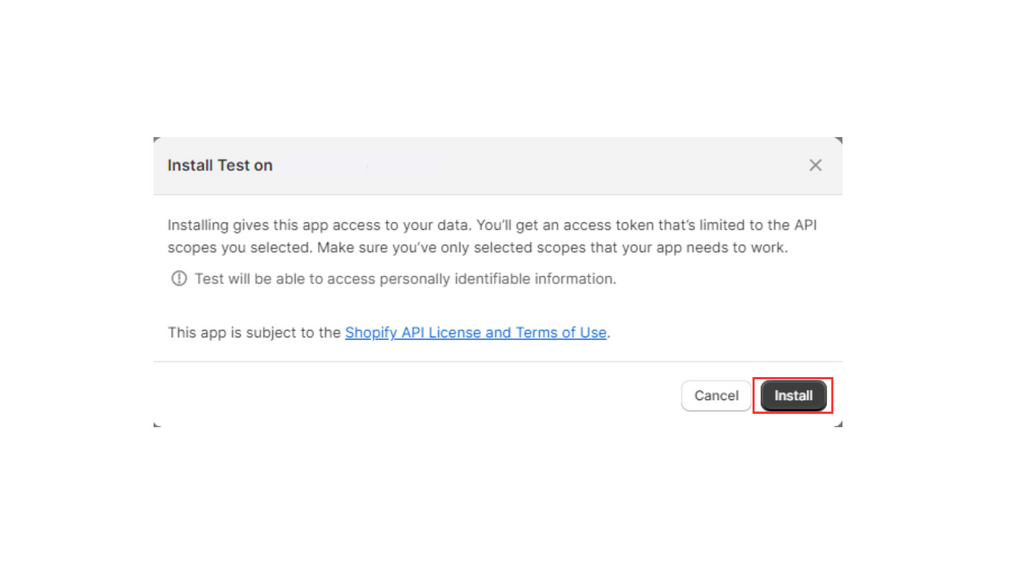
- After clicking on the Install app button , there should be a pop up on your webpage. Click on the Install button as shown in the Red Box.
X) Retrieving your Admin API Access Token and Storefront API Access Token:
- After doing so, you should be able to see your Admin API access token in the Purple Box, and the Storefront API access token as shown in the Blue Box. Please take note that the Admin API access token can only be revealed once [Reveal token once] as shown in the Red Box. Save the Admin API access token in a Notepad to be safe.

XI) Getting Domain:
- To get your domain, Click on the Domains button in the Red Box, you will find your Domain Name as shown in the Pink Box.

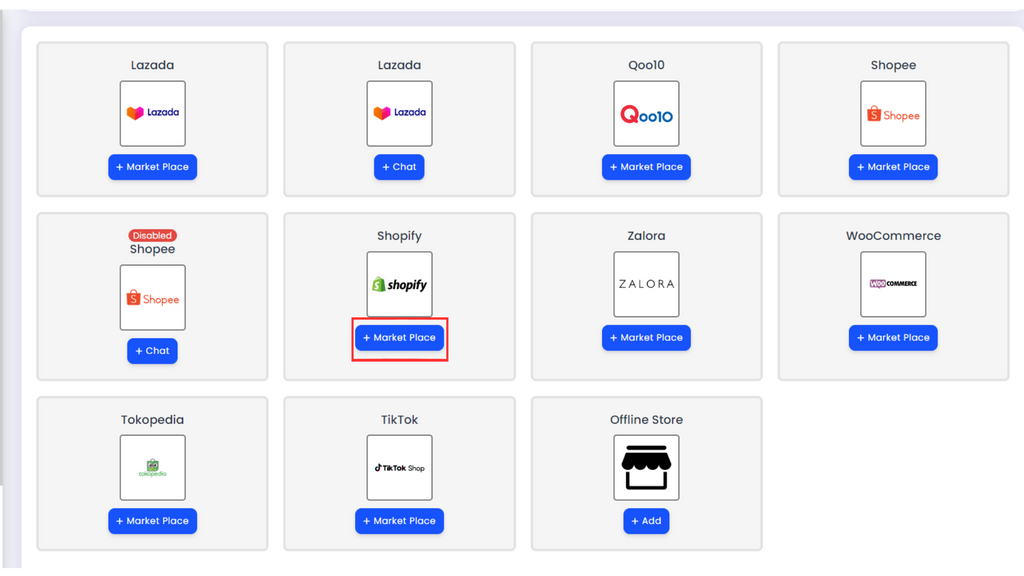
XII) Once in the Add page, click on the Marketplace Button for Shopify in the Red Box.

XIII) Using all the information that was retrieved from previous steps, use it to fill up this form and click on the "Save" button to complete the integration:
- Channel Name: You can insert your Channel Name here
- Country: Select your Shopify Store Country
- Channel Status: Switch the button ON/OFF to indicate whether the store is ACTIVE/INACTIVE
- Save: Click on this button once every details are filled in
The API Key, Admin API Access Token, Storefront API Access Token, API Secret Key and Web URL was retrieved in previous steps.
9.5) Integrating Zalora
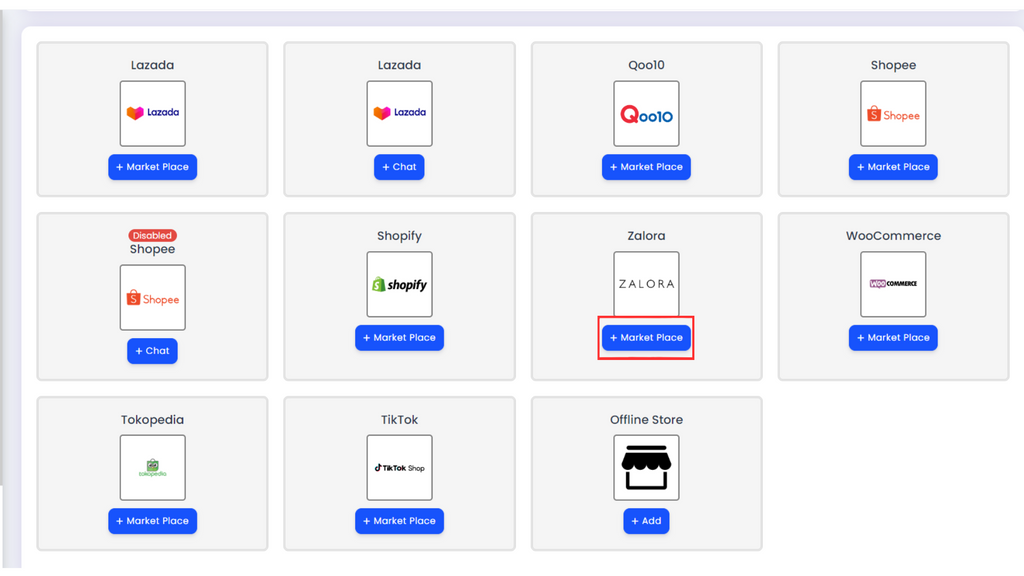
I) Once in the Add page, click on the Marketplace Button for Zalora in the Red Box.

II) Key in the details that are needed.
Channel Name: You can insert your Channel Name here
Channel Status: Switch the button ON/OFF to indicate whether the store is ACTIVE/INACTIVE
The other details needs to be retrieved from your Seller Account on Zalora.
9.6) Integrating Woocommerce

I) Once in the Add page, click on the Marketplace Button for WooCommerce in the Red Box.
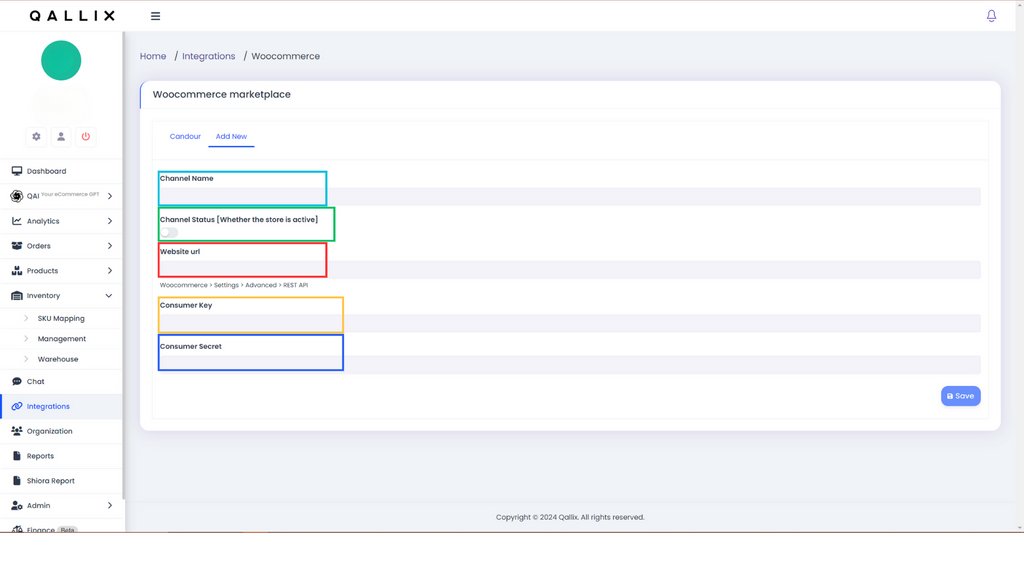
II) Key in the details that are needed.
Channel Name: You can insert your Channel Name here
Channel Status: Switch the button ON/OFF to indicate whether the store is ACTIVE/INACTIVE
The other details needs to be retrieved from your Seller Account on WooCommerce.
9.7) Integrating Tokopedia

I) Once in the Add page, click on the Marketplace Button for Tokopedia in the Red Box.

II) Details Needed:
- Channel Name: You can insert your Channel Name here
- Country: It is set to only Indonesia
- Channel Status: Currently the Status will be Pending until the Integration is fully completed
- Save: Click on this button once every details are filled in
For the Web URL, follow the steps to retrieve the information needed.
III) Retrieving Web URL:
- Log in to your Tokopedia Seller, and click on the Pengaturan [Arrangement] at the side tab. There will be a dropdown, click on the Pengaturan Toko [Store Settings] button in the Red Box. Here you can see the Status Keanggotaan [Membership Status] in the Yellow Box and your Domain Toko [Shop Domain] in the Blue Box.
Note:
Only Power Merchant or Official Store Status Keanggotaan [Membership Status] are available for 3rd party integration.

IV) After clicking save, you will receive a Confirmation Email from Tokopedia. Click on Accept in the Red Box and you have successfully integrated your Tokopedia Store with Qallix. Keep in mind, your Tokopedia Store might take a day to be visible in Qallix.
9.8) Integrating Tiktok

I) Once in the Add page, click on the Marketplace Button for TikTok in the Red Box.

II) You will be redirected to this page, where you should select one of the 3 countries that are included.

III) After selecting the region, you can sign up for a seller account in the red-highlighted box.

IV) If you already have an account, you can sign in using your phone number and password.
V) After that, follow the site instructions to authorize the permissions needed to integrate.
9.9) Integrating Offline Store

I) Once in the Add page, click on the Marketplace Button for Store in the Red Box.
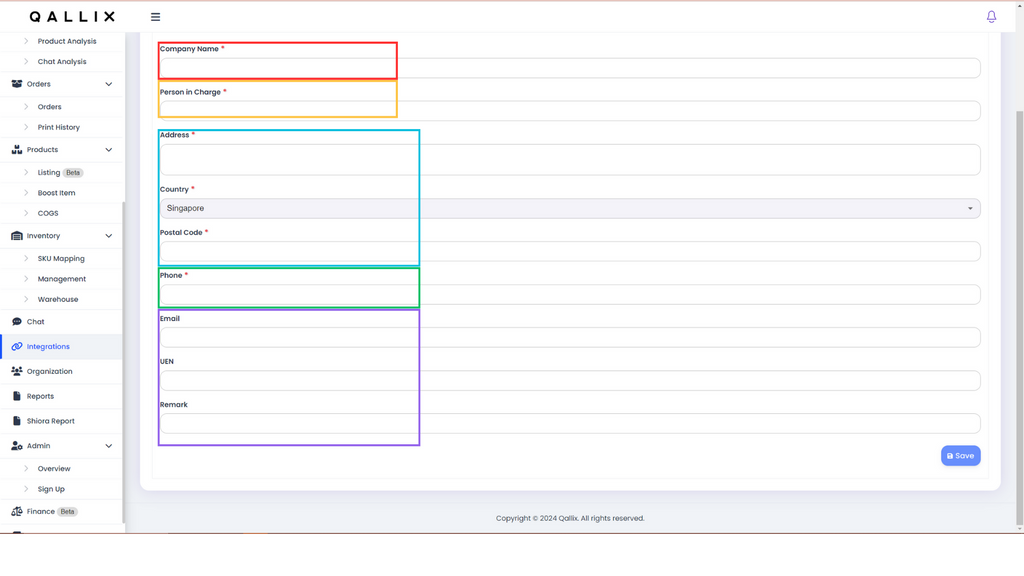
II) Enter the required Details:
- Company Name: You can insert your Company Name here
- Person in Charge: You can insert your Person in Charge here
- Address, Country, Postal Code: You can insert your address details here.
- Phone: You can insert your Phone here.
The information in the purple-highlighted boxes are optional.
III) After that, press the "Save" button to save your details.